Siggraph Asia 2016 took place last week, and included my talk on the paper Fast and Reliable Example-Based Mesh IK for Stylized Deformations. In case people find it useful, I’ve recorded a video of the slides I used for the talk along with matching narration. The talk is designed as a suppliment to the paper, and spends most of its time covering background intuitions which I didn’t have space to put in the paper itself, and conversely skims over many of the technical details what are in the paper. It’s also aimed at people that aren’t already intimately familiar with the field, so if that sounds useful to you then you can watch it below:

I have a new paper on example-based mesh deformation appearing in SIGGRAPH Asia this year. You can access the full paper, entitled “Fast and Reliable Example-Based Mesh IK for Stylized Deformations” and some videos here, but I’ll give a quick non-technical overview of the method in this post.
The goal of this project was to create a create a technique for example-based inverse-kinematic mesh manipulation which works reliably and in real-time across a wide range of cases. That’s a bit of a mouthful, so I’ll start by describing the idea from the beginning.
Let’s say you have some shape that you want to animate. To make things concrete, let’s say you want to animate this snake:

If you want the maximum amount of control and don’t care if creating the animation takes forever, there are plenty of tools available to do this by hand-drawing each frame, or keyframing, or some related technique. But if you want to create the animation interactively, for instance by clicking and dragging parts of the snake in real time, then your options are a bit more limited.
One common approach is to treat this problem as an elastic deformation subject to point constraints. That is, you pre-specify a few points on the snake that you’re going to let the user move around. For instance you could add one point on the head and another on the end of the tail. Then the user can move the head and tail wherever they like in real-time, and the algorithm will automatically figure out how the rest of the snake should bend. Of course, for any given placement of the snake’s head and tail, there are lots of ways the rest of the snake could bend, most of which look like complete nonsense. So instead you have the algorithm solve for a way that the snake can bend as smoothly as possible.
If you try this out, you’ll get something like this:
I think that’s actually pretty neat, but as you can see it still leaves a lot to be desired. The problem is that although there are a number of different ways that you can quantify what it means for the snake to bend “as smoothly as possible”, there’s still a limited amount of artistic control. This shows through in the animations, where everything tends to look like it was cut out of a sheet of rubber.
To add artistic control, this paper takes the approach of what is called example-based deformation. The idea (which we didn’t invent) is that instead of giving a single shape for the snake, the artist would provide multiple shapes:
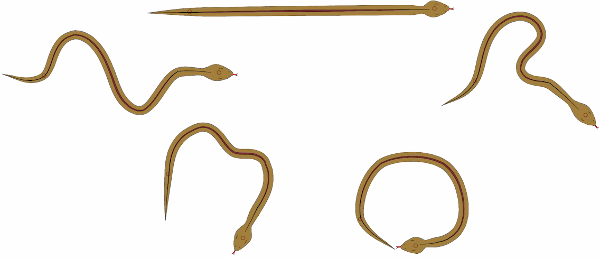
There’s a lot of extra information contained in these images, and you can use that to make the snake bend more realistically. Here’s how the result looks with our method:
To make what’s going on here a bit more obvious, it helps to show this example with each of the input images drawn in a different color. This will make it easier to visualize which of these inputs if being used at each point in the resulting animation:
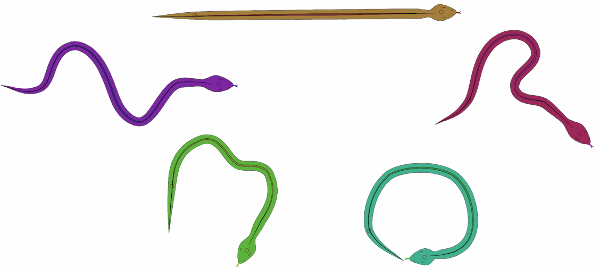
Below you’ll see the same snake animation as before, but now the color will show the degree to which each of the input shapes is most influencing the deformation. So when the snake in the animation is drawn in purple, then it’s using the purple input image as the reference for the deformation. Of course, most of the time the algorithm will be using a combination of multiple input shapes at once, in which case the animation is rendered by respectively blending between the colors of the corresponding input shapes:
This all seems well and good, but it turns out that there’s a devil in the details of getting this to “just work” for a wide range of different input shapes, and to run fast enough to be used in real-time applications. That’s what this paper is aimed at addressing.
There are three components of our method that help it work well. Firstly, we define a new form of the example-based elastic energy governing how the shape stretches, bends, and how it utilizes the input examples. Previous methods for this use energies which intertwine issues of how the shape deforms when you factor out the aspect dealing with multiple examples, and how the different examples are utilized. This makes it difficult to control the trade-offs between these two aspects, and leads to a range of different artifacts depending on the specifics of how things are implemented. Our solution to this is essentially to formulate the energy so it acts both as a typical elastic energy with regards to the shape’s deformation, and as a scattered data interpolation technique with respect to how the different example inputs are used and combined. It turns out that this works pretty well, and gives you more control over the deformation and the way the examples are used (although we only deeply explore one of the many possible variations in this paper).
In addition, we use an example-based linear subspace reduction, inspired by a similar approach used in the Fast Automatic Skinning Transformations algorithm to get real-time performance. Finally, both the example-based elastic energy and the subspace reduction are done in a way which lets the examples by used in a spatially localized manner, rather than being globally constant across the entire shape. In the above snake animation you can see this on some frames where the snake’s color changes between its head and its tail. This ends up being particularly useful in getting good results when applied to articulated characters where you move the arms/legs around since it lets the different limbs utilize different input examples.
All in all there’s a little bit more work I want to do with related to this method, but what we have so far works pretty well for a bunch of different situations, both in 2D and in 3D. You can see a few more examples below:
I’ll probably write some more about this work later, hopefully expanding on what we had space to actually include in the paper itself, but for now you can get further, and substantially more detailed infoinformation, at the project website.
Since I occasionally do work related to computer animation, it’s useful to have an easy way of displaying these animations in a webpage. The best way of actually doing this depends on what the user’s browser actually supports. Using an animated GIF is the most universally supported option, but restricts the video to a palette of 256 colors and can have a large file size. Using HTML video is a better option when it’s supported.
To help make this easier, I’m using a combination of a Python script to help in creating the needed video files, and a bit of HTML to embed them in the page. I’ve tried to write things so that the videos will work in a variety of situations including if JavaScript is unsupported/disabled, on mobile, and if HTML video isn’t supported. That said, I probably missed many cases, so don’t trust this as a foolproof solution (and it’s known to fail on mobile if JavaScript is also unsupported).
The model I’m using for this approach is a simplified form of the GIFV “format” used by imgur. The idea is to first try to load the video as an HTML video object, and fall back to an animated GIF if that fails. I don’t take Imgur’s approach exactly, but I do take some inspiration from them. Also, a word of warning: I do almost no web development, so it’s entirely possible that what follows is riddles with issues that I’m blissfully unaware of. But it seems to work well enough for me.
Creating the Video
This code is written with the assumption that your initial animation is represented as a sequence of images. If that’s not true in your case, it may need some modification. The required steps to convert this image sequence into a usable GIFV-style video are as follows:
- load the images in the animation
- optionally process each frame (for example cropping or resizing)
- save the first frame as a PNG image to display before the video loads
- save the video in both MP4 and GIF formats
All the heavy lifting for loading and saving the images/videos is done by the imageio library. Since imageio doesn’t currently support the WebM video format, we’ll just save the video in MP4 (H.264) and GIF. The basic imageio loop to do this is pretty simple, although we’ll complicate it a bit later on:
def create_gifv(input_glob, output_basename, fps):
	output_extensions = ["gif", "mp4"]
	input_filenames = glob.glob(input_glob)

	poster_writer = imageio.get_writer("{}.png".format(output_base_name), mode='i')
	video_writers = [
		imageio.get_writer("{}.{}".format(output_base_name, ext), mode='I', fps=fps)
		for ext in output_extensions]

	is_first = True
	for filename in input_filenames:
		img = imageio.imread(filename)

		# ... processing to crop, rescale, etc. goes here

		for writer in video_writers:
			writer.append_data(img)
		if is_first:
			poster_writer.append_data(img)

		is_first = False

	for writer in video_writers + [poster_writer]:
		writer.close()
There are a few things in this code which are not totally great Python style (such as the lack of good exception handling), but I think it serves its relatively simple purposes well enough. Also be forewarned that the GIF output of imageio doesn’t do a very good job of selecting a color palette, so you may see some artifacts in the GIF.
Since the return type of imageio.imread is a subclass of numpy.ndarray and imageio writers can take numpy arrays as input, there are a wide range of options available in order to preform whatever image processing steps you want on each frame. For what it’s worth, here’s what I’m using to crop the image:
def crop(img, top=0, bottom=0, left=0, right=0):
	"""Removes the specified number of rows/columns from the sides of img"""
	return img[top : img.shape[0]-bottom, left : img.shape[1]-right, :]
The code to rescale it is slightly more complex, since the simpler methods I tried led to aliasing artifacts. Here I’m using scikit-image to do most of the work. For increasing the resolution things are simple, but for shrinking the image I use pyramid-based rescaling followed by bicubic interpolation, which seems to give nice results:
def rescale(img, factor):
	"""Returns a version of img scaled in size by the given factor
	A value of factor=1.0 gives no change in image size."""
	if factor == 1:
		return img
	elif factor > 1:
		return skimage.transform.rescale(img, factor, order=3)
	else:
		inv_factor = 1.0 / factor
		pow2_factor = 2**int(numpy.floor(numpy.log2(inv_factor)))
		if pow2_factor != 1:
			img = skimage.transform.pyramid_reduce(img, pow2_factor)
		remaining_factor = factor * pow2_factor
		return skimage.transform.rescale(img, remaining_factor, order=3)
Embedding the Video
The final step is to embed the GIF video in a webpage. Something like this:
This would appear to be simple, but it’s more difficult than it looks because HTML5 video has varying support levels and restrictions on different platforms/browsers (particularly on mobile). I’ve taken an approach where the code attempts to show the MP4 video by default, but includes a couple of fallback cases depending on what features are available on the user’s browser.
In the following code, assume that you want to show an animation created using the above process and stored in the files animations/anim.{png,gif,mp4}. The first step is to embed the animation in HTML, which is pretty simple:
<div class="gifv-container" id="gifv-container-XXXXXX">
	<!-- the default video -->
	<video poster="animations/anim.png" preload="auto" autoplay="autoplay"
	muted="muted" loop="loop" webkit-playsinline>
		<source src="animations/anim.mp4" type="video/mp4"/>
		Your browser doesn't seem to support HTML5 video.  Couldn't display
		an animated GIF instead, possibly because you've disabled JavaScript.
	</video>

	<!-- handle cases where some features are incompatible
	     with the user's browser -->
	<script type="text/javascript">
		var video_info = {
			path: "animations",
			basename: "anim",
			hash: "XXXXXX"
		};
		process_gifv_container(video_info);
	</script>
</div>
The first part of this is straightforward, and just involves setting up an HTML5 video element to play animations/anim.mp4. This animation is set up to mimic how an animated GIF behaves in that it starts playing automatically and doesn’t show any playback controls.
The second section of the above code is some JavaScript which tries to fix things up if the user’s platform is likely to have problems with displaying the video. To do this, the JavaScript needs a reference to which video element it’s operating on. This is provided by the video_info variable defined above. The XXXXXX is a stand-in for a hash which uniquely identifies the gifv-container div in which the video element to be operated on resides (note the use of this hash in setting the id of the div). In your own code you’ll need to set this hash to some unique string for each use of a gifv-container div.
Anyway, there are two cases where things won’t work as intended:
- The browser can play the video, but doesn’t support the
autoplayattribute. This is common on mobile platforms. - The browser can’t play the video at all.
Before addressing these two cases, it’s necessary to detect when there’s likely to be a problem in the first place. For this I use Modernizr, which is a JavaScript library designed for exactly this sort of purpose. For this example, it’s sufficient to go to the Modernizr website and create a build supporting the “HTML5 video”, “Video Autoplay”, and “Video Loop” detectors. You can put the resulting JavaScript in the header of the page, or wherever else is convenient to make it available to the process_gifv_container function (defined below):
function process_gifv_container(gifv_info) {
	var container = document.getElementById("gifv-container-" + gifv_info.hash);

	Modernizr.on('video', function(has_video) {
		if(has_video && Modernizr.video.h264 == "probably") {
			Modernizr.on('videoautoplay', function(has_autoplay) {
			Modernizr.on('videoloop', function(has_loop){
				if(!has_autoplay || !has_loop) {
					// add controls to the video
					video_elems = container.getElementsByTagName("video");
					for (var i = 0; i < video_elems.length; i++) {
						video_elems[i].setAttribute("controls", "controls");
					}
				}
			}) });
		} else {
			// replace video with an animated GIF
			var pathbasename = gifv_info.path + "/" + gifv_info.basename;
			var gif_elem = document.createElement("img");
			gif_elem.setAttribute("src", pathbasename + ".gif");
			container.innerHTML = "";
			container.appendChild(gif_elem);
		}
	});
};
This function first detects if the browser can play the video. This is done with the Modernizr.on function instead of a simple if statement to account for the fact that Modernizr detects video support asynchronously, so the test may not be complete when this function is called. If video is not supported, the function modifies the DOM to remove the video element and inserts an animated GIF in its place. Assuming the browser can play the video, it’s still possible that some needed features will be unsupported, in particular the autoplay or loop attributes. In this case the JavaScript just modifies the video element to show playback controls for the animation. It’s not a perfect solution, but it works well enough, and I prefer it to resorting to an animated GIF.
That’s it! A bit more involved than I would have liked, but all in all it’s not too much code, and it gives results nice enough that I feel it’s well worth it.
The introduction of lambda functions in C++11 makes a new type of loop construct very convenient to write. I’ve been using this approach with increasing frequency in my own code, and it leads to clean solutions to all sorts of loop-related problems. This is basic textbook C++11, so those of you who already use C++11 features regularly will likely already be beyond familiar with all of this, but if you’re not, perhaps you’ll find this useful too.
First, let’s look at some of the common ways of writing loop-like constructs in imperative languages. There are three common conventions I’ve tended to encounter in imperative languages. The first is to explicitly increment an index counter, common in C, C++, and a host of other languages:
for(int i = 0; i < n; ++i) {
	// code using i goes here
}
Another convention is to use an iterator instead of an explicit counter. Languages like C#, Python, and Icon implement this particularly nicely with support for generators at the language level, but you can implement a similar construct in almost any language:
for i in xrange(n):
	# code using i goes here
C++ also contains conventions for writing iterator-based loops, and in C++11 language-level support was added with the syntax for(auto i : arr) { ... }, making these loops quite easy to use, although I still find coding up the iterator itself to be a bit of a pain.
Another option is taken by Ruby, and is probably the most flexible. In effect, you create an anonymous function containing the code that you want run within the loop. This function is passed into another function which invokes it a number of times with the appropriate parameters:
n.times { |i|
	# code using i goes here
}
Technically this sort of loop has been possible in C++ since the beginning, since it inherited the necessary capabilities from the function pointers supported in C. Nevertheless, the introduction of lambda functions in C++ makes this sort of loop much easier to write, so much so that they tend to actually simplify the resulting code.
Here’s an extremely simple example, which illustrates the idea even if it isn’t particularly useful just yet:
template<typename Func>
void loop(int n, const Func& f) {
	for(int i = 0; i < n; ++i) {
		f(i);
	}
}
This construct can then be used like so:
loop(n, [&](int i) {
	// code using i goes here
});
The nice thing about this approach is that it cleanly separates the code executed within the loop from the code determining how the loop itself is executed. For example, it’s almost trivial to write a version of loop which executes the iterations in parallel:
template<typename Func>
void parallel_loop(int n, const Func& f) {
	#pragma omp parallel for
	for(int i = 0; i < n; ++i) {
		f(i);
	}
}
This parallel_loop function is called in exactly the same way as the loop function given previously, and comes with the added advantage that you can change the multithreading to something other than OpenMP without touching anything other than the parallel_loop function itself. The simplicity and flexibility of this approach has led to its usage in a number of modern parallel processing libraries, such as the parallel_for found in Intel’s Threading Building Blocks or the parallel_for_each in Microsoft’s Parallel Patterns Library.
The flexibility of this way of writing loops makes it useful in situations more general than basic for-loops. For instance it’s a handy to time the execution of a block of code. The version below is the simplest form, but it’s easy to modify to run the function f multiple times and collect statistics. Again, this modification involves no change to how time_in_seconds is called (other that potentially dealing with a change in the return value type):
template<typename Func>
double time_in_seconds(const Func& f) {
	std::chrono::time_point<std::chrono::system_clock> start, end;
	start = std::chrono::system_clock::now();
	f();
	end = std::chrono::system_clock::now();
	return (end-start).count();
}
Another easy example is a utility function to fill in a summed area table:
template<typename Arr, typename Func>
void calc_summed_area_table(
	Arr& S,
	const Func& f
) {
	for(int j = 0; j < S.height(); ++j) {
		for(int i = 0; i < S.width(); ++i) {
			auto x = f(i,j);
			if(i > 0 && j > 0) {
				S(i,j) = x + S(i-1,j) + S(i,j-1) - S(i-1,j-1);
			} else if(i > 0) {
				S(i,j) = x + S(i-1,j);
			} else if(j > 0) {
				S(i,j) = x + S(i,j-1);
			} else {
				S(i,j) = x;
			}
		}
	}
}
You probably get the idea by this point. There are tons of other cases where this pattern can be used. Not surprising since, after all, there are languages like Ruby which use something similar as their most common mechanism for writing loops. One drawback worth noting about the C++ case, however, is that you lose the ability to use the break statement. You can fake it to a degree with a bit of effort, for instance by having the passed in function return an error code or the like, but it’s definitely not as simple as with normal for-loops. This is the price to be paid for the added flexibility. Still, even lacking this feature it’s a surprising handy pattern to have at one’s disposal.